Artillery Basics by mnstc
- anonimouse1
- Apr 16, 2021
- 18 min read
Updated: Sep 17, 2022
Does not reflect WOT changes 06/22/2021 new arty rounds & mouse scroll wheel changes.
There is an Artillery Clan -NBA- (Nothing Beats Artillery)
For the long version with a more detailed explanation
Any material that I have not authored and I use or have copied from another website I try to gives credit to the author if known and the website with a link posted.
mnstc: MultiNational Security Transiton Command
Some helpful links:
https://wiki.wargaming.net/en/World_of_Tanks
Thanks to: Blackhawk, Drippie, Taco, rdks, Dorn_B_Dynn, Bee. Monhair, Patonic
Grey Highlited Sections to be added to Artillery Rough Draft Post.
I recommend watching two videos: Spotting Mechanics and Bush Mechanics. Watching them will pay dividends in knowing what gets you spotted and how to hide.
You Tube Video: Explaining Mechanics: Vehicle Spotting - YouTube (website link)
Explaining Mechanics: Concealment - Part 2 - YouTube (Link to website)
https://www.youtube.com/watch?v=Gj3-WDx7Zus
https://www.youtube.com/watch?v=y-1Ofw2sCnE
THE BARE BASICS:
Shift key to put it in arty mode or change back to driver view (TD Mode)
G key to switch between overhead and trajectory
Small circle small circle - try and wait until you have the smallest circle
Generally stay back unless you are short range arty (You are a one shot dolly).
Generally spot behind cover (back side of hill/etc ...)
Use concealment when ever possible.
If you spot in the open make sure enemy is outside your white circle (Max View Circle). Where can I be spotted from in the white circle, move or use cover or 15 meter behind concealment.
Keep it simple
The Rule of 5:
1 Small circle - Small circle - Small circle
2 Pre-aim
3 Patience
4 Aiming target in center of map firing V (Keeps reticle from blossoming)
5 Lock your tracks (Wide Firing V - when possible narrow firing V)
Second Five
6 CTRL Key + Mouse Right Click (Moves aim to where you click on the map)
7 High Ground (Spot your arty on higher ground then the targets)
8 Battle Field Analysis
9 Battle Field Preparation
10 Splash Damage/Splash Kills.
More
11 Fifteen meters behind vegetation when possible (reduce muzzle flash)
12 Max View Range (Are you outside direct observation within the max view range)
13 Mini-Map (Train yourself to look during reloads and when aiming circle is closing)
14 Think options don't get one tracked target fixated
(wait don't charge, other routes, etc)
15 High Ground (Easier shooting high to low then low to high)
16 Aim way short as circle closes move it to target.
17 Bail out locations to re- spot to (near and far)
18 Do you need to re-spot to make the shot especially end game.
19 Moving Targets - Aim where they will be when the shell lands (3 - 5 vehicle lengths)
Explained in detail in Artillery Rough Draft Notes

For a detailed explanation of artillery please go to my post this web site:
LINKS
Bonus Code | Guide | World of Tanks | World of Tanks (website link)
WOT guide to World of Tanks (Overall not just arty)
Artillery Guide by Tyraforce – Part 2 | For the Record (wot-news.com)
Tank Manuals | Guide (worldoftanks.eu) (Nothing on artillery)
Battery's Revamped Arty Guide - Game Guides and Tutorials - World of Tanks official forum
HOME - World of Tanks Console (XBox and PS4)
World of Tanks - Best Artillery for Every Tier | GAMERS DECIDE
ARTILLERY VIDEO
Artillery Views:
Driver View (Also called TD View/Mode)
Overhead View
Trajectory View
Artillery Keys:
Left Shift: Changes from driver view to artillery view or vice versa.
G: Switching between overhead and trajectory view
T: To mark a target (Sometimes if friendly in aiming circle it will say Help)
RMB (Right Mouse Button):
To lock barrel in place (i.e. for a shotgun blast)
To be able to look in another direction without moving turret or changing direction (arty).
Other: You can use the mouse to change where your gun is aimed or your direction of travel versus using the a/d keys.
Locking Tracks for more accuracy
Types of Artillery.
Five types of arty:
Short - Med Range: Generally Tiers II - IV (Crusader Tier VII)
Short Range High Arc (Can lob behind buildings and rocks)
SU I8 II, FT BS II, Loyd II, Bishop V, FV 304 VI (Pin point accuracy).
Med Ranger High Arc
Grille (Lobs very close behind buildings and rocks)
Medium Long Range High Arc
105 le FH18B2 (Leaf Blower) (Can lob behind buildings and rocks)
Long Range
Generally Tier V - X except as noted above
Spotting.
Spotting is a bit different for each type, for short and med range if you can not cover the whole map, spot to cover main attacks/defense points or pick a flank. Generally there
are only 1 or 2 main battle areas with several skirmish areas. Look at the map mentally
draw a line from the main battle area back to friendly side for possible areas to spot.
Considerations is it a safe location to spot, are you boxed in if spotted or can you hide
behind something. Preferably you have at least one escape route.
Other Keys:
Z: Warning Triangle, Help, Support Me, Acknowledge help request.
F8: Reloading
ESC: To exit battle when you are dead
Ctrl + Right Mouse Bank + click on map shifts aim to that point
(Start of battle where you intend to go)
Ctrl + Left Mouse Bank pings the map where you click the cursor on the map
Ctrl "c" to copy and Ctrl "v" to paste when using the mouse to copy and paste does not work using the mouse, you still have to use the mouse to highlight the text to copy it.
https://spottis.com/games/world-of-tanks-controls/https://spottis.com/games/world-of-tanks-controls/ (some of the keys below seem to be incorrect - will be corrected)
Yellow text denotes editing required
Move — W / A / S / D
Camera Rotation — Mouse
Fire — Left Mouse Button
Aim / Zoom — SHIFT
Radial Conmmand Menu — Q
Auto-Aim / Lock Turret — Right Mouse Button
Supplu Slot — 1 with ARROW KEYS for radial menu
Supply Slot — 2 with ARROW KEYS for radial menu
Supply Slot — 3 with ARROW KEYS for radial menu
Switch Ammo Types — 4 / 5
Camera Zoom / Trajectory Toggle — G
Lock Hull / Siege Mode — I
Reload Shell Container — C
Handbrake — SPACE
Scoreboard / Scoreboard — M
Cruise Control — R
Hide / Show Full Map
Pause Menu — ESC
Interface navigation:
X — ENTER
◯ — ESC
▢ — X
△ — Y
Radial Command Menu - Z
T Attention to Position (Aim at the location you want to mark - then hit T)
F2 Driving to position
F7 Help
F8 Reloading
Platoon Chat Keys:
H: Enable/disable chat platoon chat
Q: Voice chat (Click mouse somewhere in the garage and then hit "q")
Tab Key: Use the tab key to change between room chat and platoon chat, text will be in orange for platoon chat and green for room chat.
Platoon voice chat does not always work in garage but generally works in battle.
Things to improve performance
Training
Crew Skills especially BIA (Brothers in Arms)
Equipment (Vent Purge 5 percent to crew skills)
Food Consumables (Can sometimes be costly but very helpful, reduces load time,
improves crew performance)
Directives
Suggested Equipment.
Rammer
Enhanced Gun Laying Drive
Improved Rotation Mechanism or Turbo Charger
Bino's, Optics or Camouflage
#1 equipment slot is power slot move what you need there especially the rammer)
Sometimes you can use case hardening instead of suspension to get equipment
upgrades costs silver vs xp - generally works but not always
Crew Books (Can only be used once crew is 100 percent trained), Personal Reserve and
Accelerated Training can be used to train the crew or get skills faster.
Crew Skills. BIA is recommended first, it only works everyone has the skill at 100 percent.
If you are comfortable resetting skills you might choose another skill first, then reset at the earliest possibility (when second skill is about 40 percent). Sometimes I will take the loss in resetting skills to BIA to have certain skills temporarily.
Commander
1. BIA or Sound Detection.
2. Sound Detection or BIA
3. Eagle Eye or 6th Sense
Gunner
1. BIA or Dead Eye
2. Deadeye or
3. Snap Shot or Designated Target
Radio
1. BIA or Situational Awareness
2. Situational Awareness or BIA
3. Extend Range or Relay Communications
Loader
1. BIA
2. Concealment
3. Repairs
4. Fire
Driver
1. BIA
2. Off Road Driving (Increases Speed and improves rotation)
3. Clutch Breaking
4. Repairs, Concealment, or Fire
You can use Free XP (Experience) to increase crew skills.
If you crew swap and all the crew has BIA skill at 100 percent you will get at least of percentage of BIA on the new vehicle even if the crew is not 100 percent trained.
When crew swapping it is recommended you do not take the whole crew, if you are just starting out this might be the only option.
Two schools of thought, yes and no, neither one is right or wrong, use what works best for you.
Try to take the Commander, Gunner, and Radio Operator from different crews.
If possible take them from the vehicle where you get the most most XP. (Higher Tier, Premium Vehicle, a vehicle you do well with and get lot of XP with in a battle)
An example of a possible crew swap you have just got the M43 and your crews are trained and have 1 skill (BIA preferably) on M41, M44 and M12. You take the Cdr from one vehicle, the gunner from another, and the radio man from a from a 3d, then a strip vehicle of both loaders or take on from 2 vehicles and put them on the M43. Three benefits by doing this if they all have BIA - the BIA is in effect even if they are not trained on the new vehicle, they generally start at 90 percent, and they seem to train quicker. I have got crews fully trained in 20 - 30 battles doing this. Then when you get the M53 - same deal, granted each vehicle loses a little bit when you take one from it but the new vehicle is buff :)
Types of experience (XP)
Free xp: Can be used to research equipment or a vehicle.
Blue Prints can be used to research a vehicle - not recommended under Tier VI)
Battle xp: Used to research equipment for the vehicle or research the next vehicle.
Crew xp: For increasing crew training and crew skills.
Marks of Excellence. Doing more damage/damage assistance then 65 percent of the
players, award is shown on the barrel and listed under vehicle awards. Damage is an area you have some control, winning/losing is team dependent, some good teams some bad.
If you are getting close to a Mark of Excellence (within 2-3 percent) consider using food consumables and orderly ammo rack directive or aim tuning directive.
Master Badge. Higher Experience (XP) in battle then 99 percent of other players for that
vehicle in the previous 7 days.
Equipment and Consumables.
Generally for equipment: Vent Purge (If Available), Rammer, Ehanced Gun Laying Drive,
and Improved Rotation Mechanism in that order but sometimes a turbo charger in lieu of
IRM.
Consumables: Small Repair kit (Slot 4), Large Repair kit (Slot 5), First Aid (Slot 6)
Generally Arty blows up a fire extinguisher is not used often. Use the small repair before
the large it costs a lot less.
Equipment Slot 1 is the power slot, put your rammer there for maximum effectiveness.
Consumables. Put your consumables in the same number for every vehicle to save time, instead of having to look where a consumable is.
Consumables: Generally not worth the cost of buying, if they were free it is well worth it. Generally don't need a fire extinguisher on arty (use if free).
Food Consumables, Gasoline, and Directives are a one time use, one game only.
Repair/First Aid/Fire Extinguishers multiple games if you survive.
Personal Reserve. Can be used for extra: Crew XP, Battle XP, Free XP and Credits.
Accelerated training. Can be used to train crew faster, draw back not as much XP used for
equipment and vehicle research.
Field Modifications.
Turn off Accelerated Training to apply experience to Combat XP
Equipment Tweaks and Levels
Equipment Tweaks you are giving up something to gain something elsewhe.
Level III - 1 percent dispersion
Level IV - 2 percent dispersion
Level V - 3 percent dispersion
Keep you gun barrel down when moving either right click to lock in place or use the mouse.
BASIC TIPS
If you are going to play arty, start at Tier V on an arty tech line. Collectibles do not research higher tier arty.
Below Tier V is a bit more difficult to play and you do not learn the best spots for artillery locations generally. There are some benefits such as firing at fast movers.
The aim time is about 5 sec but that is for a 60 percent reduction in aiming circle - for best firing resolution it takes about 10 sec to get the smallest circle (all Tiers). As noted the aim time is for a 60 percent reduction in circle size.
To pursue the artillery line you have to get and research the the Tier IV TD just below the Tier V Artillery, that leads to the Artillery Tech Line.
THE BASICS BH (COMMISSAR KHARKOV):
The purple italicized section immediately following, is copied from Commissar Kharkov's
web page, the link is posted at the end.
1). To enter the artillery overview mode, hit the "Left-Shift" button. Now you have a top-down view of the battlefield.
2). In the top-down view, you can use the mouse scroll wheel to zoom in and out.
3). The green line represents what you can potentially hit. The red lines show obstructed areas. The gray line means it is out of range.
4). The "Golden Rule of Arty Dots" - if you see an oval of dots in your top-down view, that's the area your shot will land in. If you don't see the dots, it doesn't matter if there is a green line to the target, your gun is not facing the right way. To resolve this, rotate the hull of the tank. You may have to zoom out in top-down view to see the dots as they track around. Note that in some tanks the hull will rotate automatically (albeit slowly) and the SU-26 is an exception as it has a turret (so auto-rotates).
5). Once you have the dots showing in the target's area, hit "X" to stabilize the gun. This will prevent the hull from moving but will increase the accuracy.
Good point to consider doing locking your tracks, X is the default setting.
6). Center the "oval of dots" over your target, adjust for any movement (it takes a second or two for the arty shot to get there), and shoot. If the target is stationary, try to put the tank between the "crosshatch-mark" and the "center-dot" to increase the chances of hitting it.
7). If you are following a target and the dots stop moving while you are tracking it, hit "X" to unlock the gun stabilization and allow the hull to turn. Manually turn the hull if need be. Then hit "X" to stabilize the gun once you have the target lined up.
8). Rain death upon your opponents!!!
Some other tips:
- Find a good place to set up. Hiding is good, like in a bush or behind a building. Move away from your base a bit if possible to avoid getting shot up by base-rushers.
- If an enemy tank gets near:
-- switch back to normal view by hitting (Left-Shift), and get ready for a direct-fire "shotgun" attempt on them.
-- Use the attention function on the minimap to make your teammates aware of the problem (Hold down "Control", then mouse-click on the minimap).
-- As soon as the enemy tank is dealt with, you will need to immediately relocate. Enemy arty will target your last known position and nuke you, so be sure to move away a bit.
- Upgrade to a good radio as soon as you can, as this means access to more target data from your teammates.
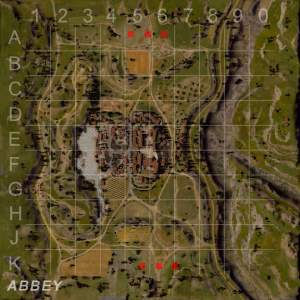
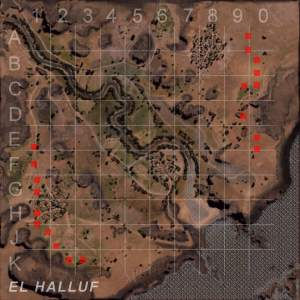
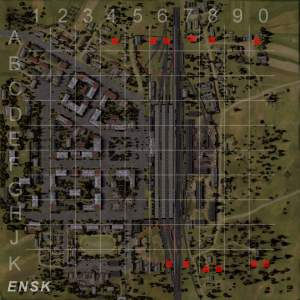
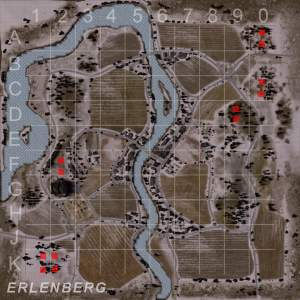
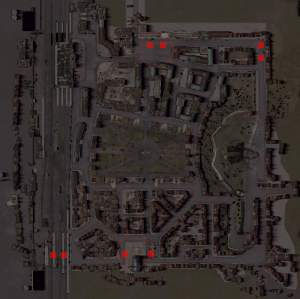
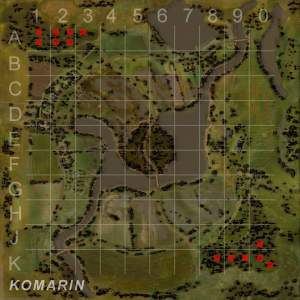
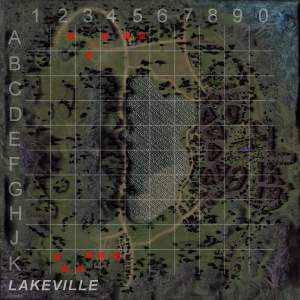
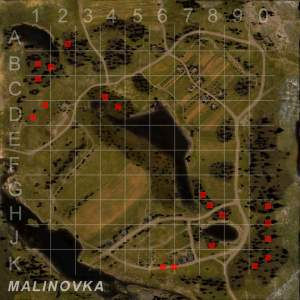
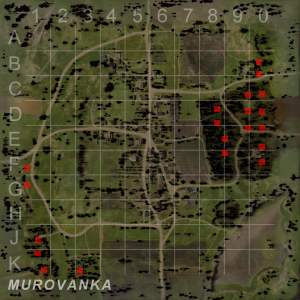
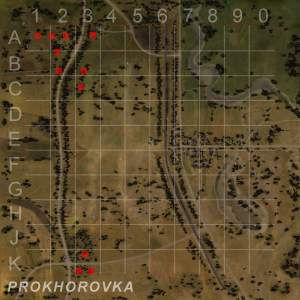
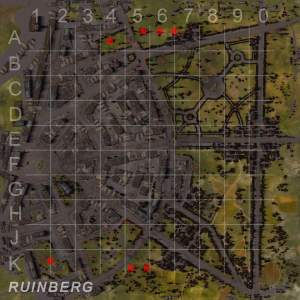
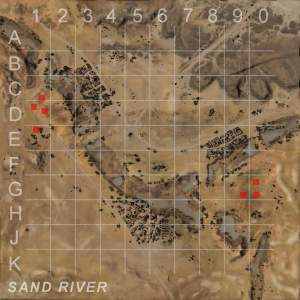
Artillery Locations. (Generally med to long range artillery - These are not all the locations )
These locations are from the World of Tanks SPG Guide Author is unknown

Himmelsdorf World of Tanks SPG Guide (worldoftanksguide.com)

Karelia Shots into D4
There are locations in A7 - A0 not shown and K7 - K0
Prokhorovka World of Tanks SPG Guide (worldoftanksguide.com)
There are locations in A6 - A0 not shown and K6 - K0
There are locations in A1 and A2, A7 - A0 and K6 -K0 not shown
There are locations in A1, A2, B1, F1, E0, F0, H0, J0, and K0 not shown
Don't blame the game or team, everyone has to deal with the same game mechanics and you don't get to choose your team, focus on what you can do, sh*t happens.
Note to self: Edit and then post in Artillery Rough Draft Notes
Fire Blind. Blind fire certainly works – especially against noobs, and tank destroyers, arty or even tanks hiding at base, and they hadn’t realize they were spotted.
If you see an enemy comfortably settled, and if they didn’t move from their spot, then you have a good chance to fire at that spot – even if you had to do it blind. You can even fire blind at moving targets and still score a kill.
When you see too many targets on the map, take a note where TDs and defending tanks are hiding. Remember which bush, and which rock. Then come back later and fire blind at those spots.
Blind fire works. It has worked too many times, got me too many kills – that any good arty player must fire blind when the circumstances look promising.
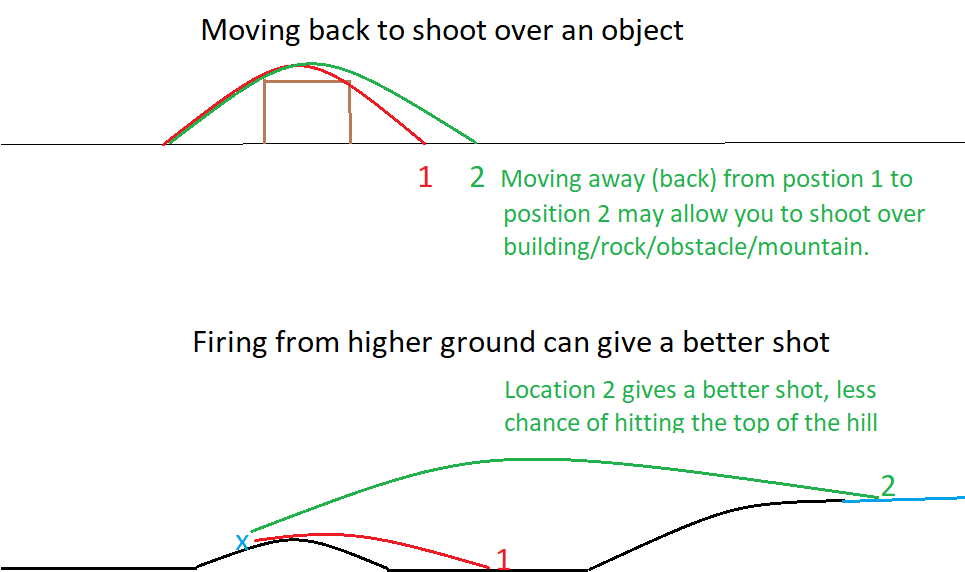
Sometimes you have to move to get a better shot.
Video
World of Tanks SPG Guide (worldoftanksguide.com) (Same Video as above)
LINKS
Artillery Basics (wixsite.com)
You Tube Video: Explaining Mechanics: Vehicle Spotting - YouTube (website link)
Explaining Mechanics: Concealment - Part 2 - YouTube (Link to website)
Bonus Code | Guide | World of Tanks | World of Tanks (website link) - Not just Arty
Artillery Guide by Tyraforce – Part 2 | For the Record (wot-news.com)
Tank Manuals | Guide (worldoftanks.eu) - Nothing on artillery
Game Guides and Tutorials - World of Tanks official forum - Various subjects good info
Battery's Revamped Arty Guide (WOT official forum) - Good Breakdown by nation
HOME - World of Tanks Console (XBox and PS4)
To be completed - Firing V's of the Different Artillery wixsite.com
Map Strategy: Highway - WoT Guru (Link to website) The link gives some artillery spots.
These locations are from the World of Tanks SPG Guide Author is unknown
Posting Replays.
Go to settings and enable saving replays. I only save the last replay as limited space on my computer.
POST ENDS HERE
__________________________________________________________________________________________________________________________________________________________________________________________________________________
scHnuuudle_bop (12:18:27 PM) a programmer buddy of eldest says there usually is 3 types of things like the RnG. When you first log on, your random number is decided.
scHnuuudle_bop (12:18:47 PM) At the beginning of each battle, everyones is decided.
scHnuuudle_bop (12:19:29 PM) or most likely, sort of like a bird flying in front of you. Each shot is given that random chance. Gunner sneezed.
flux_farad_rebel (6:15:58 PM) It seems to be less of a grind if you are just training the gunner with a trained crew or you are training the rest of the crew and have a trained gunner
To be added
I understand the Field Modifications a little better -- Just increasing the Level without any equipment tweaks can decrease shot dispersion At level III - 1 percent IV - 2 percent and V - 3 percent
mnstc If you use the Comparison Tool you can see the overall effect on vehicle characteristics
mnstc I have been happy with the shot dispersion decrease just by inceasing the levels so I have not done any Equipment Tweaks
sjparsneau I will have to geek out on that info
mnstc oh I think it stats at Tier VIII but maybe Tier IX you get an additional power slot for equipment scouting or survibablity for arty (useless lol) but it might apply to other vehicles too
Shortening time it takes reticle to get small
Can lock tracks/gun in one direction while observing with aiming reticle in another.
If target appears in firing V return aim there - very little reticle bloosom and aiming circle closes faster (use for counter battery) - if target appears where aiming reticle is - unlock tracks and wait for the aiming circle to close on target.
NOTES TO SELF (Read them if you like)
Adapt your style of play play to map or change your style of play based on the map
Choose equipment which helps your style of play or makes up for vehicle weakness/own or enhances your style of play/vehicle
TD - Vent or Rammer Camo Binos
Aim Short and move to target for artillery with long aim time
Head to head - Aim way short/small dot or switch to driver view.
Juke 1 thousand 2 thousand juke
When you don't have any tanks to spot approaching threats for you aim at most likely avenue inside your current view circle as you will not spot them outside that unless they fire.
Which way is the oppossing gun pointed when you are hidden, if at you no time if away you have more time to aim.
Destructible: Some rooftops/chimneys, adobe/clay/wood buildings
Corrections to rough draft
Crew Skills. BIA is recommended first, it only works everyone has the skill at 100 percent.
If you are comfortable resetting skills you might choose another skill first, then reset at the earliest possibility (when second skill is about 40 percent). Sometimes I will take the loss in resetting skills to BIA to have certain skills temporarily.
Spotting slightly out of normal spots so less likely for them to see tracer fire
Been looking into what you brought up with Artillery the two dots, it appears the one with the circle with hash marks is where the gun is pointed and the other appears to be the aiming dot.
mnstc I thought it was reverse, because in artillery mode the circle represents the aim along with the corresponding reticle
mnstc It might be why I have been missing some of my direct fire shots
One on one vs tank. Arty elevates better tanks depress better back up from berm or crest of hill. Remember to Juke.
When playing a tank - herky jerky motion when firing to throw point of aim off tank shooting at you, make it harder to hit weak spots.
???? Long/large circle - shoot when large by the time reloads it should be small???
Snap shots vs small circle?
Lower Tier? : Binos/Camo versus Turbo
Upper Tier Turbo so don't have to change where spot?
Generally seems get outspotted so bino before camo?
If you survive you don't pay for food consumables?
if you have a fast reloading arty aim time can be a factor so a enhanced gun laying drive can cut your aim time buy 1/2 sec (5 (aim time) x .1 (enhanced gun laying drive reduced) = .5
to get the smallest circle takes about 8 - 10 sec. Point enhanced gun laying drive might be less of a factor with guns with long reloads (30 sec)
Binos/optics and camo netting versus enhanced gun laying drive?
Rammer, Bino, Optics/Turbo (real slow vehicles)
if the enhanced aim drive reduction in aim time is equal to 20 percent of the reload time use the enhanced aiming drive, otherwise use another equipment that may help out more
TD - learning where to spot the swedes with siege mode is throwing me for a loop, what spots are good for non siege mode and what spots are good for siege mode
anonimouse: I figured out you find a spot that you will not have to move. Get a spot and look for the battle to come to you. When the seige is set, Its a damn good shooter.
Scout vehicles - camo and bino versus optics and bino?
heavies optics and binos - camo will not do much good
fast vehicles - binos and camo?
Equipment chosen is what enhances your style of play what works for others may not work for you. Most recommend Vent, Rammer, ? I prefer Vent plus bino/optics and or camo.
where are good firing locations - do you have the speed to get there - what positions support main battle areas - camo versus spotting.
swede td's with seige - good spots for siege and non-siege
mediums fast - optics/binos mediums slow binos and camo
consider food consumables to get temporarily to 100 percent
use equipment you will use the most often rather then possible eventualities.
Rammer, Enhanced Gun Laying Drive (EGLD), Improved Rotation Mechanism (IRM) versus Camo and Binos? Rammer, EGLD, IRM
turbo on some of the really slow arty upper tiers because I don't like changing where I postion
At times RNG is off, sometimes it is consistent other times it is not. it it is consistent adjust for it (if short aim a micron long (gnats but hair) if it is inconsistent hope for the best.
Is HE + (HE Pentration) going a bit long? Do you need to aim a hair short?
Dead Eye skill seems to make a big difference BIA then Deadeye
Analyze the map (scouting note) best route to mask fires are any tanks covering your advance, if not reconsider route.
Marks of Excellence. If you are going for a Mark of Excellence and are close to getting it consider using food consumables and orderly ammo rack directive (lowers load time) or aim tuning (I prefer the orderly ammo rack).
Crusdader Forward (middle finger) Right (d fore finger) - Left (a ringer finger) then Back (s - middle finger) and opposite of right/left that was used moving forward.
Crusader - backwards past tank then fire?
drifting spin move - let off gas and turn? let off gas, break and turn? hit reverse and direction key?
you might have to back up to get a shot over boulders/buildings
when positioning adjust view so you are looking level with top of vehicle, not from above and behind
arty view trajectory - tank close put tank between nearest edge of circle and dot when you don't have time to aim properly (small circle)?
. .
. .
. o H . ?????
( , . . . . . ..
For borderless game
Settings
Graphics
Upper left drop down list
Borderless or Windows Borderless
Windows borderless works ok in windows
Bordless - sceen blacks out when changing to windows (Window Key)
Blind shots.
Fire Blind. Blind fire certainly works – especially against new players, and tank destroyers, arty or even tanks hiding at base, and they hadn’t realize they were spotted.
If you see an enemy comfortably settled, and if they didn’t move from their spot, then you have a good chance to fire at that spot – even if you had to do it blind. You can even fire blind at moving targets and still score a kill.When you see too many targets on the map, take a note where TDs and defending tanks are hiding. Remember which bush, and which rock. Then come back later and fire blind at those spots.
Blind fire works. It gets kills a good arty player will fire blind when the circumstances look promising.
Other
Counter Battery - 1 - 1.5 vehicles behind tracer (Untested)?
Which way is the opposing gun pointed when you are hidden, if at you no time if away you have more time to aim.
Equipment chosen is what enhances your style of play what works for others may not work for you.
When positioning adjust view so you are looking level with top of vehicle, not from above and behind to see if you can be spotted
Keep you gun barrel down when moving either right click to lock in place or use the mouse.
Adapt your style of play play to map or change your style of play based on the map
Choose equipment which helps your style of play or makes up for vehicle weakness/own or enhances your style of play/vehicle
If you have a fast reloading arty aim time can be a factor so a enhanced gun laying drive can cut your aim time buy 1/2 sec (5 (aim time) x .1 (enhanced gun laying drive reduced) = .5 to get the smallest circle takes about 8 - 10 sec. Point enhanced gun laying drive might be less of a factor with guns with long reloads (30 sec)
Notes to add:
Field Modifications and decreasing shot dispersion
Three Parts to game
Map Knowledge
Main Battles Areas
Generally 2 but can be up to 4
Firing Locations
Spotting Locations
Which location will give you the most spots
Routes
Key Terrain
Game Mechanics
Spotting
Bush Mechanics
Vehicle Weak Spots
Flat Spots
Tracks
Ports
Vehicle Skills
Shooting
Spotting
Bush Mechanics
Use of Terrain
Side Scraping (Tanks generally)


I know we were talking about chili and I find this to be a good one. Happy tanking (And eating):)
Ingredients
2 pounds of ground chuck
1 pound of hot Italian sausage
3 15 ounce cans red kidney beans, drained and rinsed
2 15 ounce cans chili beans with sauce
1 6 ounce can tomato paste
2 28 ounce cans diced tomatoes with the juice
1 large onion chopped
3 stalks of celery chopped
1 green bell pepper seeded and chopped
1 red bell pepper seeded and chopped
1 jalapeno, left whole
2 jalapeños seeded and chopped
4 slices of bacon fried to a crisp then chopped
4 cubes beef bouillon
1 bottle/can dark beer Guinness is awesome but I’ve…